

With so many contact form plugins now offering visual builders, Contact Form 7, once the king of contact forms, might start looking a little old and dusty, but before you write it off, let me show you how to put your fields into columns and style them to look more like Divi’s own form module.
Why Use Contact Form 7
Although Contact Form 7 might not have a visual builder and take a little more effort to set up, it certainly makes up for it with all the functionality it does offer. Let me highlight a few that make it a winner for me:
- You can install a plugin called Flamingo and save all the messages sent with your forms. It’s made by Takayuki Miyoshi, the creator of Contact Form 7 so you can trust it to be perfectly integrated with CF7.
- You can track form submissions with Google Analytics. You can link this to your AdWords campaign to track your conversions.
- It handles conditional recipients. In other words, you can choose who receives the email based on a selection made by the visitor.
- You can use Google’s reCAPTCHA with it.
- With the addition of a free plugin, you can add a MailChimp signup checkbox to your forms.
There’s so much going for Contact Form 7 and best of all, it’s free. Nothing that I’ve mentioned above will cost you anything other than the time it takes you to set it up.
Styling Contact Form 7 to Look Like The Divi Contact Form Module and Adding Columns
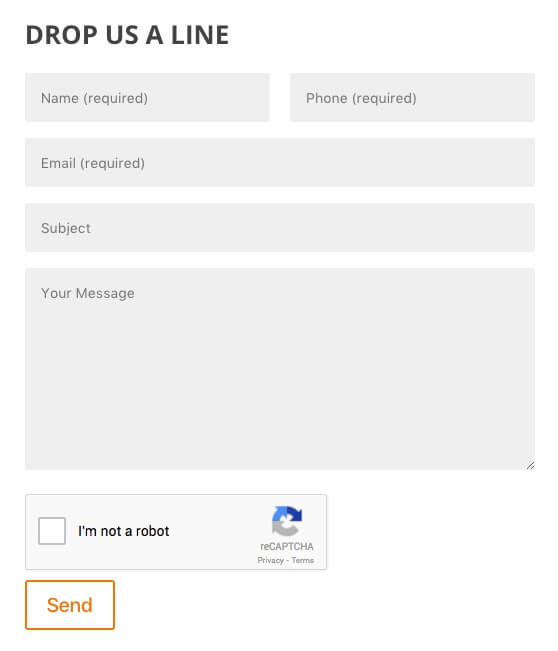
Let’s begin by styling CF7 up a bit. The look we’re going for is this:
Step 1: Add the CSS to Style CF7
Add the following CSS to either your child theme or wherever you prefer to put this stuff.
This CSS is a minor variation of the example given on agentwp.com in their article called Making Contact Form 7 to Look Like Divi Contact Form Module. It’s here that you’d change things like colors, fonts sizes and the border radius of the fields and button.
Step 2: Install the Contact Form 7 Shortcode Enabler Plugin
In order to add columns to CF7, we need to be able to use shortcodes (see the next step) but, out of the box, the Contact Form 7 editor does not support them. Fortunately for us though, Tobias Zimpel (TZ Media) has created this nifty little plugin called Contact Form 7 Shortcode Enabler, and just like it says, it allows you to add shortcodes to CF7. So go ahead, download and install this plugin and head on down to step 3.
Step 3: Add Columns Using Divi’s Built In Column Shortcodes
Now that you’re enabled the use of shortcodes in the CF7 editor, it’s time to get to work adding columns to your layout. Fortunately for us, Divi comes with a tonne of predefined shortcodes including shortcodes for columns. You can check out the entire list of shortcodes with examples of their application in the shortcode documentation of the Elegant Themes theme called The Professional. There are cool shortcodes like the Dropcaps shortcode but I’ll leave you to discover them on your own.
For the example form pictured above, I used the following HTML in the CF7 editor (first tab):
You’ll see that in the first line I’ve included the column shortcode together with placeholders. Placeholders place the titles of each field into the field itself rather than above the field. You can obviously choose not to use placeholders and you can also change the number of columns, just refer to the CF7 documentation and the shortcode documentation respectively for more detailed instructions if you need to.
If you’re going to use reCAPTCHA, see the documentation on CF7s website for a hand guide.
Wrapping It Up
And there you have it, a beautiful Contact Form 7 form with columns and it’s responsive at that! So go ahead, install Contact Form 7 and style it up a bit. With 3+ million active installs, you’ll be hard pressed to find a more trusted, stable, and free contact form out there.
Feel free to add a comment below, it’d be great to hear your favorite CF7 feature and implementation.
Photo by Michael D Beckwith on Unsplash


Cool tutorial. Thanks.
Nice Article.
How to achieve Post-Comments-Form like yours.
Awaiting for Tutorial on this issue.
It’s a fairly stock installation of the Extra theme 🙂 so no tinkering on my part.
How to achieve under Divi theme?
Hi Rob, thanks for this. very useful. It took me a while though to realise that the formatting was important. Specifically, if [/one_half] and [one_half_last] are on separate lines, the columns are not top aligned. I don’t actually think you need to have everything on one line though. I think this works and, for me, has a reasonable structure…
[one_half]
[text* your-name placeholder “Name (required)”]
[text* your-email placeholder “Email (required)”]
[text your-subject placeholder “Subject”]
[/one_half] [one_half_last]
[textarea your-message placeholder “Message”]
[/one_half_last]
Hi Rob, I am using the file upload option in CF7, have been able to format all except this using this tutorial. Would you have CSS code to format this?
Styling this button isn’t so straightforward. I’ve found this article which should get you going in the right direction: http://www.zyxware.com/articles/3900/how-to-customize-and-display-file-upload-button-for-a-contact-form-7-plugin-using-css-and-jquery
Hi Rob, Awesome tute, thanks for sharing, I am having and issue where I am not able to format the {Browse…] button once added.
Also is there a way to get home of the CSS styling of a button on the website so it can be applied to this example
Hi Mario, check out my comment to the previous comment.
I have been quite frustrated with the lack of design abilities for Contact Form 7.
A year ago, I was tasked with creating multiple forms in cf7, with complex layout requirements. To solve this problem I set about creating a plugin that allows for responsive grid-layout designs as well as the ability to have a modular approach to form building, ie being able to reuse existing forms into larger form constructs.
I just released the Smart Grid-layout design for CF7, give it a try and let me know what you think, (https://wordpress.org/plugins/cf7-grid-layout/)
Hi Rob, I have followed the directions but I am not having success with the columns. the text is underneath each other at 50% width. Suggestions?
Hi Rachel,
Can you paste a copy of your code here and maybe a link to the page in question?
i have this problem too(
This was really helpful! Thanks a lot.
you just made my life about three thousand times easier. thanks!
Hi Rob this is a great tip and using it on a couple of my sites right now, only thing is I can’t seem to get the label text into the entry boxes like your example shows, Any ideas or maybe Divi have made so many changes it no longer works.
website is whiteleyjuice.com and the contact form is on every page.
Cheers