
Ever had a client who’s given you poor quality images and you’ve got to do your best to make them work? I know, I know, of course you have. Well, here’s a little trick that can give those pics a little zing or at least make them appear better than they really are: place a pattern or translucent color over them, or even both! This overlay effect works particularly well with full width hero images.
With a little CSS and touch of imagination you can turn the ugly duckling into a beautiful swan, and hey, if the images aren’t bad to start with, you can give that swan a little lipstick.
Before you begin, head on over to Patternify and generate yourself a few patterns. If you prefer, you can create the pattern yourself with your favourite tool, mine is Affinity Designer. I’ve found that a 4×4 pixel image works quite well.
Simple Textured Overlay
Let begin with a simple textured overlay. Although you can apply an overlay to almost anything, I’m going with the obvious application of a texture over an image in it’s own row. So, head on over to your Divi Image Module, insert your image and place the following CSS into the BEFORE section which you’ll find under the Custom CSS section of the Advanced tab of your image module. You’ll obviously need to change the path and filename of your image in the background URL.

Textured Overlay With Color
Okay, now that you’ve got the idea, let mix things up a bit. So again, head on over to your Image Module and placing the following CSS into the BEFORE section which you’ll find under the Custom CSS section of the Advanced tab of your image module. And again, you’ll obviously need to change the path and filename of your image in the background URL and unless you like the color I’ve used, please feel free to replace it with your color of choice and remember to set its translucency otherwise you won’t be able to see through it.
The order in which your backgrounds appear are determined by the order you place them in (comma separated) when you set the background property, the first being on top and the rest following in order.

Overlay With Color Only
This time we’re going to just place a color over the image. As before, add the following CSS to the same place as in the previous examples.
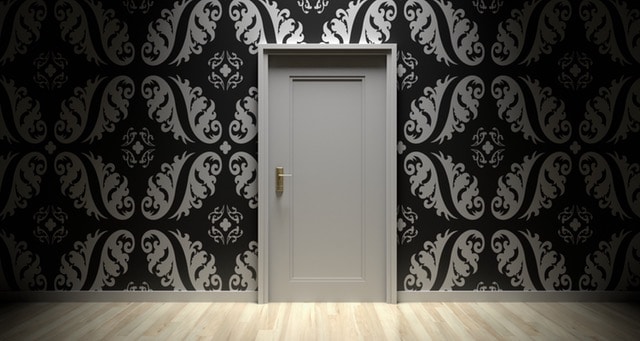
Texture Under Text or Other Modules
Okay, how about using this behind other modules like in the example below? Well, it’s pretty easy. All I’ve done in here is set the background image of the row and then applied pretty much the same CSS as we’ve done with the textured overlay with color above but this time I’ve applied it to the BEFORE section of the Row instead of the image module.
Styling
Wrapping It Up
Well, that was easy wasn’t it? It’s quite amazing how something so small and simple can make such a big impact, so go ahead, experiment and see what you can come up with. With the Divi theme it is really so easy to build a beautiful website. Oh, and before you go, check out my article on image optimization to get that little bit more performance out of your page.


Nice tutorial! Learned a lot! Thanks!
Can’t wait to try these!
Remember to use a 4×4, 6×6, ie, even numbers for the pattern. It took me a couple of minutes to figure out why my patterns were behaving “strange.”
Nice tutorial man! Learned a lot! Thank you!