

In this tutorial, I’m going to show you how to add a fixed flag to the side of your Divi site. I did this for a recent project where I had to add a “Find Your Dealer” flag to the side of most of the pages. The flag also needed to stay in place as the visitor scrolled down the page effectively creating an attractive and discreet call to action that’s ready and waiting to be clicked on.
The Example
The flag consists of a little bit of text inviting the visitor to perform an action, and a Font Awesome icon which, in this case, is the map marker icon. Here’s what the end product looks like:

For a live demonstration, check out my Divi layout pack called Beachhouse. I’ve added a flag on the right hand side of the page that says “Layout Pack by Divi Notes”. You’ll notice that it also slides out a little as you hover over it with your pointer.
A Quick Video Overview
Adding Font Awesome to Your Divi Installation
For the map marker icon to work, your site needs access to the awesome selection of Font Awesome icons. The quickest and easiest way to achieve this is to head on over to bootstrapcdn.com and get a copy of their link to the HTML version of the Font Awesome CDN. At the time of writing this tutorial, the link looked like this:
Now you could just copy this example but it might have been updated to include newer versions of Font Awesome which means you’ll be missing out on all the latest awesomeness of Font Awesome.
Now that you’ve done that, head on over to the Divi Theme Options panel and click on the Integration tab and past the HTML you’ve just copied in the previous step into the field labelled “Add code to the < head > of your blog” and click on Save Changes.
Add A Little HTML
Next up, we’re going to add a little HTML. This tiny bit of HTML is all that you need to add to generate the content of the flag. You can obviously change the text that appears on your flag to read whatever you’d like.
Depending on where you want it to appear, you can either add it to the field labelled “Add code to the < body > (good for tracking codes such as google analytics)” which you’ll find on the same tab as the field you’ve just pasted the Font Awesome CDN in (Divi Theme Options > Integration tab), or you can pop it into a Divi Code Module which you’ve inserted on the page or pages you want the flag to appear on. For my client, I added it to a global section which I’d used across all the pages they wanted it on.
Add The CSS
Pretty much all the magic happens in the CSS, so paste the following CSS into the style.css file of your child theme or wherever you prefer to add it. One day I’ll write a post on the various places you can do this.
There are two lines here that you might want to edit. The first being line 5 which determines how far from the top of your page the flag will be positioned, and the second being line 33 which is where the icon is defined. The icon is set by using its unicode value.
Finding The Unicode Value of a Font Awesome Icon
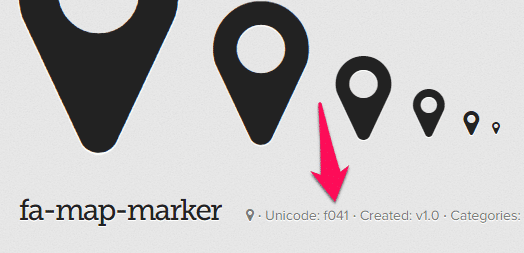
If you’re not going to use the map marker icon, the next step is to decide which icon you’re going to use on your flag and then find its unicode value. In the example above, the map marker icon has a unicode value of f041. You can find all the available icons on the font awesome website. Click on the icon you’ve settled on and find its unicode value on the page that loads after clicking on it. You’ll find it just below the examples:
Now that you’re chosen an icon and made a note of its unicode value, head on over to the CSS and edit line 34.
Hiding the Flag of Mobile Devices
As the flag becomes a little obtrusive on narrow screens, you’ll probably want to hide it. Well, if you didn’t notice, I’ve already added the media query to the CSS (line 68 onwards) which will hide it on screens that aren’t wider than 980px wide.
Wrapping It Up
And there you have it, a nifty little bit of HTML and CSS to add a spiffy little flag to your Divi pages.
Photo by Matt Popovich on Unsplash


This is great tutorial, is it possible to make it visible on mobile?
Hi Goran,
If you remove the media query (@media) and it’ll show. The problem is it might obscure the contents of your page.
thank you, very usefull
Nice tutorial. I have a challenge, it does not show on chrome. Any help on that?
Hello Jim,
You possibly have a conflicting script. I use it on all the layout packs that I’ve published here: https://diviplayground.com/free-divi-layouts/