
A couple of posts ago I started the first in a series of reviews of the free CodeLights plugin called SiteOrigin Widgets. My first post in this series was on the Flipbox component of this plugin. Now I will explore the image hover effects or as they call it, the Interactive Banner component with the Divi or Extra Theme. This component essentially offers 8 image overlay/hover effects (they call them animation types) to which you can apply one of four animation easings.
The Demo
Here’s an example of each effect, all with the same Animation Easing, which in these examples, is ease. The name of the animation is given in the title of the the text displayed over the image. The animation is triggered by hovering your mouse over the image or in the case of a touch screen, touching the image will trigger the animation.
Melete
Phorcys
Caeros
Aphelia
Soter
Aidos
Hebe

Nike
The Details
Now that you’ve seen what it can do, let me show you how easy it is to create the same.
Begin by installing the SiteOrigin Widgets plugin and then in your Divi layout add a text module for each image you’d like to use in your design. In the editor you’ll see a new icon in your toolbar.
![]()
Clicking this icon brings up a window that asks you to choose from the six components the plugin offers.
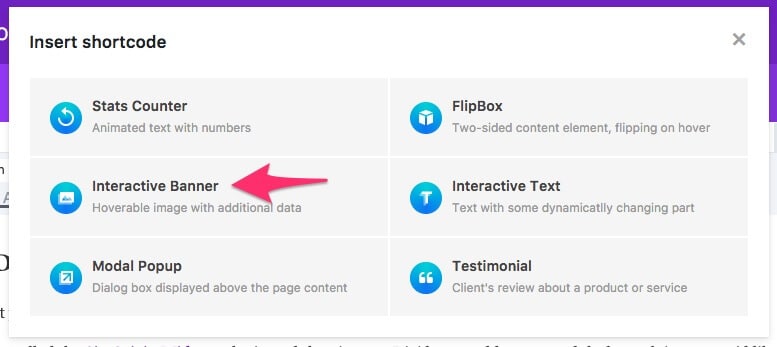
In this tutorial, we’re going to use the Interactive Banner option. This brings up the settings window which you’ll use to choose which animation type you’d like to use (see arrow below) as well as the text you’d like to have appear over the image.
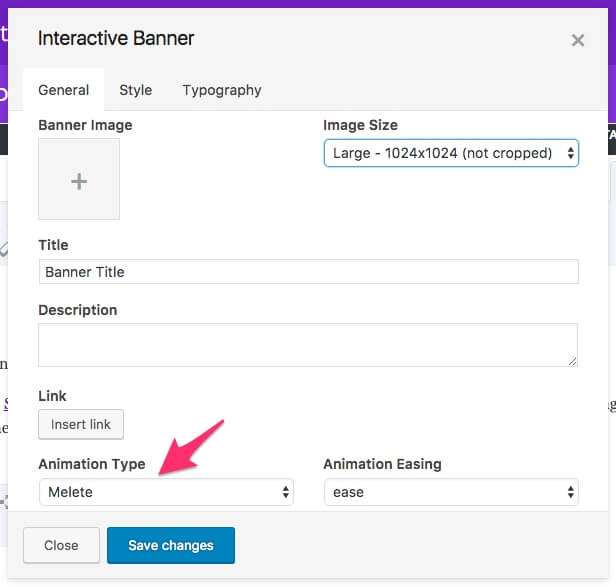
As you can see, there are three tabs which are pretty self explanatory, so go ahead, add your image and text and tailor the settings to your needs, click Save Changes and and the resulting shortcode will be added to the text module. If you decide you need to make an edit to the shortcode, simply highlight it and click on the CodeLights icon in the toolbar. This will bring up the Window with the setting already in place, waiting for you to make your changes.
Wrapping It Up
You’ve got to love this free plugin! I mean, it’s got so much to offer and what it does, it does well, and the good folk over at CodeLights are maintaining it (they have updated it numerous times since its initial release). And since it plays nicely with Divi, it makes for a very useful tool. If there was one thing I could ask for in this component, it would be for more control of the animation speed. Some of the animations are just a little too fast for my liking.
If you’d like more options or deep Divi/Extra integration, grab a copy of Image Intense, it’s a great premium plugin and integrates into the Divi Modules window. I bought a copy a while back and it’s paid for itself already in the time I’ve saved. There are also a number of tutorials out there for the DIY’ers if you prefer not to use a plugin for something like this or you’re looking for more variety. Here are a few you can check out:
- Animated Image Caption Hover Effects in Divi – divilife.com
- Image Module Hover Effect – yatesdesign.com.au
- Four Linkable Image Hover Effects – divisoup.com
Any there we have it folk, a quick and easy way to add image hover effects to your Divi posts and pages.
If you know of any other good hover effect tutorials, please feel free to add them in the comments below.


Awesome, thanks! There are so many people searching for these tools for DIVI and here they are, plain and simple 🙂
So nice, easy and comfortable. Thank you!
It is a pertty because the link function it does not work for me. The title is missplace and broken inside the image. The hover effect is gone as well.
Do you have an example page I could look at?
Yes,
This is waht happens
http://rcletras.com/yourwebpage/index.php/testing/
The system does not allow me to post for second time the screenshot of what happens. I did not receive any answer the first time I posted and now it does not show up.
Hi,
Thanks for the tut, it should do exactly what I was looking to do.
But, I know it isn;t your plugin, but would you have any idea why the hover isn’t working? I have a title but hovering ofer the image is doing nothing.
Could it be beacause I’ve made the section full width with a gutter of 1 to allow two images side by side to cover the page?
Hi Chris, can you export your layout and send it to me ([email protected])? I’ll have a look and see if I can figure it out.
Thanks Rob, I think it may be a bigger issue.
I also have Image Intense, but tried this option as I wanted the style offered by the PHORCYS option.
When it didn’t work, I tried using Image Intense, but that didn’t work either. So I think whatever is the issue is beyond just the layout.
I’ve raised a ticket with Image Intense and will see what they come back with. If relevant I will post the solution here too, just in case anyone else has a similar problem.
Thanks for your offer of help.
Hi,
I think I have worked out what is causing the issue. I had a negative z index applied to the section holding the image intense modules, as I’m trying to style my site with some overlapping layers. When I changed the z-index to a positive number the hovering worked.
I just need to go through and apply higher z-index values to the other elements I was trying to hide the image section behind with the negative value.
Thank you SO MUCH! This is SO AWESOME!
I’m tweaking the CSS on Caeros a little (got rid of the zoom/scaling) but I’d like the main image to have NO transparency (opacity: 1) and have the hovered image be darker.
I can’t seem to figure out what line in the CSS is controlling the unhovered img opacity…
First there’s
“.cl-ib.animation_caeros .cl-ib-image:after” opacity 0.25…
then there’s…
“.cl-ib.animation_caeros.hover .cl-ib-image:after” opacity: 0.75;
But I would guess the unhovered image is somewhere around a 0.9 opacity ???
I just can’t wrap my head around this one!
Any help would be appreciated!
Hi Abby, are you able to share a link to the site you’re working on? If not, could you fire up a test site on Pilvia.com?
Hi Rob,
Sure! It’s http://empowermentstudio.com/home
Thank you so much!
It’s the section titled About The Session, about halfway down the page.
Here’s the CSS as it is now, without the 7s image zoom:
.cl-ib.animation_caeros .cl-ib-image {
background-color: inherit;
-webkit-transform: translateY(0);
transform: translateY(0);
-webkit-transform-origin: 50% 0;
transform-origin: 50% 0;
-webkit-transition-duration: 300ms;
transition-duration: 300ms;
-webkit-transition-timing-function: linear;
transition-timing-function: linear;
}
.cl-ib.animation_caeros .cl-ib-image:after {
content: ”;
position: absolute;
top: 0;
left: 0;
right: 0;
bottom: 0;
background-color: #5b5c5c;
opacity: 0.25;
-webkit-transition-property: opacity;
transition-property: opacity;
-webkit-transition-duration: 400ms;
transition-duration: 400ms;
}
.cl-ib.animation_caeros .cl-ib-title {
text-align: center;
-webkit-transform: translateY(30px);
transform: translateY(30px);
-webkit-transition-duration: 400ms;
transition-duration: 400ms;
-webkit-transition-property: -webkit-transform;
transition-property: transform;
}
.cl-ib.animation_caeros .cl-ib-desc {
opacity: 0;
text-align: center;
-webkit-transform: scale(0.7);
transform: scale(0.7);
-webkit-transition-duration: 400ms;
transition-duration: 400ms;
-webkit-transition-property: -webkit-transform, opacity;
transition-property: transform, opacity;
}
.cl-ib.animation_caeros.hover .cl-ib-image:after {
background-color: #5b5c5c;
opacity: 0.75;
}
.cl-ib.animation_caeros.hover .cl-ib-title {
-webkit-transform: translateY(0);
transform: translateY(0);
}
.cl-ib.animation_caeros.hover .cl-ib-desc {
opacity: 1;
-webkit-transform: scale(1);
transform: scale(1);
}
Awesome, plugin! I have a question. Can I change the hover background-color from the greyish in the example? I’m tweaking the CSS on melete, but can’t seem to figure out what line in the CSS is controlling the background-color. Any help would be appreciated. Thank you!
Hi Kristina,
If I understand you correctly, you can change the background to anything on the Style tab (second tab) of the Interactive Banner window.
Cheers,
Rob
What an amazing plugin. Really love this. Many thanks!
Thankssssss, a couple of days searching something like this, you save me 🙂
i think there is an issue .. when i insert link .. it does not work .. anybody confirm it ?
I have the same problem – when there’s no link everything works fine, hover effect etc. on image, but when I add a link it crash the effect and whole animation! Solution?!
I have the same issue – will not work at all when a link is inserted. 🙁
I have reached out to ET and to the plugin developers. ET said that it’s not their problem as they didn’t develop the plugin (https://www.elegantthemes.com/forum/viewtopic.php?f=187&t=844240&p=4629893#p4629893). I also approached CodeLights (https://wordpress.org/support/topic/widgets-with-hyperlinks-not-working/) but have had no response. Add your voice to the issue and let’s see if CodeLights will do something about it.
I’m having the same issue – when I add hyperlink – the text hover is gone. Please help!
Looks like the latest Divi update has broken something. I’ve logged a ticket with the plugin developer but haven’t had a response. I’ve also pointed the issue out to ET but need to pursue this further. Please log a ticket too, that way we’re more likely to get a fix.
Hey,
I got a question, my problem is that i want to have it responsive in the middle of the square. But nothing changes when i change the image size. Can you help me out.
Thanks you already for your attention.
Hi Nick,
Not sure what you mean. Could you send me a screenshot? [email protected]
I am not finding it in my tool bar .. so lost. Maybe i’m doing something wrong?
Hi Jessie, it only works from the backend, not the visual Builder.
Hope you come right.
I’m going to send a ticket to elegantthemes for solve the issue
Please let me know if you hear back from ET. Would love to use this plugin, but it’s useless unless the link function will work.
Really bummed.This is exactly the kind of hover functionality I was looking for and like everyone else, when I use the add link feature the plugin breaks. I really wish there was a workaround.
Thank you for the information on the plugin, I have a problem, the effect does not take the whole picture, in my text module
Would you have an idea to solve the problem, thank you
Hi, do you and a link that you can share?
How can I get the image sizes to be consistent? I have created multiple images to display on the page and they are all the same size. However when using Interactive Banner, some them get cropped and some do not, even when using identical settings.