

I was asked to add a search field into the menu bar for a recent project so in this tutorial I’m going to show you how I did it. Having the search field in the menu bar gives your site’s visitors a quick and easy way to search your site. This tutorial is really easy, there’s no php, just a little HTML and some CSS to make it look pretty.
The Example
The site I used this on was for a small bookstore and part of the design brief was a search field in the primary menu bar. This is what it looks like:

Step 1: Get the HTML from the Existing WordPress Search Field
The first step in this process is to get the HTML of your site’s existing search field. I’ve placed the HTML below but for the curious I will explain where it came from. The easiest way to get this HTML is to use Chrome’s Inspector Tool. Begin by finding the search field on your site. Navigate to http://yourdomainname.com/?s= and you’ll be presented with the stock search field together with search results. Once you’ve found the field, right click on it and select Inspect. Chrome will then present you with the following:

Now, right click on the line the starts with <form role=”search” and then choose Edit as HTML. Now copy that HTML. It should look like this:
If you’d like the add placeholder text into the search field you need to remove the line <label class=“screen-reader-text“ for=“s“>Search for:</label> and add placeholder=”Find what you’re looking for:” into the first input field as in the example below:
Please remember that if you’re using the HTML I’ve provided, you’ll need to change the domain name in the action field in the first line.
Step 2: Add The Menu Item
Okay, you’ve got the HTML, now it’s time to add this thing to your menu bar. It couldn’t be easier… just head on over to your WordPress Dashboard, and find the WordPress Menus page (Appearance > Menus). Now add a custom menu which includes the HTML you’ve just copied. Here are the three steps you’ll need to take:
- Click on Custom Links
- Add a hash to the URL
- Paste the HTML into the Link Text field.
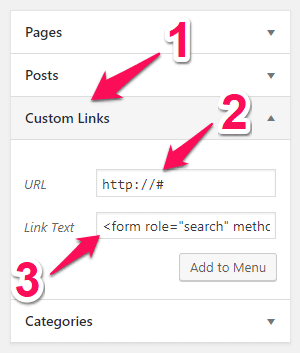
Once you’ve done all that, click the Add to Menu button. Now all that’s left to do is to remove the URL and save your menu. You would remove the link by clicking on Custom Link and then deleting the contents of the URL field.

Step 3: Making it Look Pretty
Okay, you’re nearly done. Out of the box, the search field doesn’t look so pretty so let’s put some lipstick on this thing. Add the following CSS to your child theme’s style sheet or add it to the Divi Custom CSS field in the Theme Options tab (Divi > Theme Options > Custom CSS).
At this point you’ll probably want to play around a little and get the button to match the color scheme of your site. I’ll leave that up to you to play around with.
The End
Now wasn’t that easy? Now you have a cool little search field in your primary menu bar.
The inspiration for this tutorial came from a video by System 22 I.T. Solutions called Divi – Add a Search Box to the Divi Theme Menu or Any WordPress Theme Menu.
Photo by Sylwia Bartyzel on Unsplash
Divi Notes started as a way to document my own WordPress and Divi web design/development journey and, to my delight, has grown to become a helpful resource to many other Divi users out there. If you’ve found Divi Notes to be useful in your journey, I’d appreciate it if you would consider supporting me using the form below.


Whst you use for sending the newsletters?
THANK YOU! That helped a lot!
I have tried to add custom search bar on my website, but the problem is my search bar and search button are not coming in on line, Here is my website, redefineseo.xyz
Sorry, but this solution does not work at mobile phone devices. When you try to write search phrase to field menu, whole menu rolls up ond closes or am I wrong?
Having the same problem too, I thought it might be css issue and that my search bar is getting overlapped by other elements but I checked it’s supposed to be good. I can write on it if I long press on the field (triggers pasting function of the field).
Is there any fixes for this?
Hi, I moved search form from primary menu into header.php file. You need to check it on different screens size and customized it with css @media in order to achieve correct display with rest of primary menu.
Where in the header?
Hi, Thank you so much for this! I have searched the net for ages trying to find how to add the search form to my custom menu. I’ve tried different plugins that haven’t worked or been too complicated. Although this is Divi I’m using Storefront & Woocommerce and it’s worked.
This was easy and works OK, but now I need to change the search for pages instead of posts.
It’s really a good trick! I was looking for this and finally found here. I’ve attached this search in one of my client website.
I am using Ocean WP child theme. I have downloaded ocean WP child theme from official site of ocean WP. I have activated ocean WP child theme. I have imported /exported the settings of parent theme as mentioned on official website of ocean wp. (I haven’t made any changes to function.php because all changes required to enqueue style sheet are already written in function.php automatically)
I have added the CSS code for making pretty the search button in top bar but it didn’t work.
Can you please let me know what i am doing wrong.
Hi Rob, many thanks, this is a very quick and easy solution!
But I have one problem with it: I want to use this solution for mobile but the burger menu closes as soon as I tap the search form. Does it only work on Desktop devices?
Best regards,
Robert